WinTV Settings
Click the WinTV Settings button or Configuration under the Options Menu in the main TV window to open Settings.
Settings is separated into several tabs.
General - General settings.
Recordings - To specify the locations for recordings, timeshift buffer file and snapshots.
Padding/Quality This section needs explanation.
Devices - Tuner setup for channel search and configuration of external video inputs.
All Channels - To manage your channels.
Favorites - To define your favorite channels.
Parental Control - To enable parental control (North America only).
Advanced Options - Advanced options.
WinTV Extend - To Configure Wintv Extend (optional)
Settings / General

Version
Version : The current version of WinTV 10 installed is displayed.
Activation Code
WinTV v10 Activation Code : The activation code used to activate will be displayed. As well the product the code was paired with.
Languages
User Interface Language: Select the language of the application user interface here. Changes take effect after restarting the application.
Preferred Audio Language: Specifies the preferred audio language for multi language-broadcasts.
Closed Caption Service: Specifies the preferred subtitles language for broadcasts with multi lingual subtitles
Use SPDIF Output: If this option is enabled, audio will be routed to the S/PDIF output of your soundcard.
Show Captions: If enabled, subtitles are displayed (when available).
Video Renderer
EVR or VMR9: Specifies the video renderer to be used. The video renderer is a software interface to your display adapter. Changes take effect after restarting the application.
Use hardware acceleration MPEG-2/H.264 and HEVC: If enabled, the hardware acceleration, that newer display adapters offer, is used. This may improve system performance when displaying video. Changes take effect after restarting the application. MPEG-2/H.264 is most common used signal type. HEVC also know as h.265 is newer signal type in some European countries.
Monitor Shape
4:3 or 16:9: Select the aspect ratio of the connected computer monitor here.
Auto-size window: If this option is enabled, the aspect ratio of the application window is always kept constant when resizing the window.
Settings / Recordings
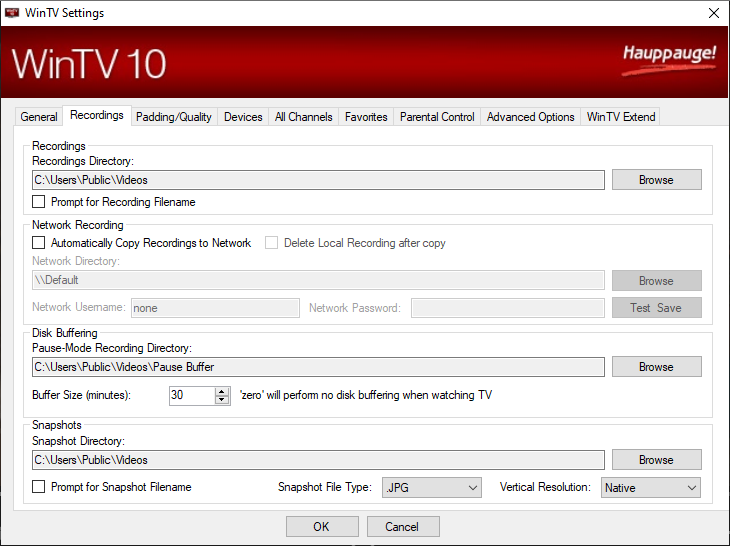
Recordings
Recordings Directory: Specifies the folder where recordings are saved. You can click on Browse to select a different folder. Also snapshots are placed here.
Network Recording
Information needed here.
Disk Buffering
Disk Buffering is used to enable time-shift, where the TV content is continuously buffered to your hard disk.
Pause-Mode Recording Directory: Specifies the folder where the temporary disk buffer file is placed. You can click on Browse to select a different folder.
Buffer Size (minutes): Sets the duration in minutes for which the TV content is buffered to hard disk. Enter 0 minutes to disable disk buffering. Changes take effect after restarting the application.
Snapshots
The following settings refer to snapshots, i.e. still images of the currently displayed TV / video. Snapshots are generated by pressing the space bar or Snapshot button ![]()
Snapshot Directory: Specifies the folder where snapshots are saved. You can click on Browse to select a different folder.
Snapshots File Type: Specifies the file type of the saved snapshot file JPG or BMP.
Vertical Resolution: Specifies the vertical resolution of the image, i.e. the number of lines. You can select between:
-
Native: The image is saved in the currently displayed size.
-
480 - 1080: The image is zoomed to the selected number of lines, before it is saved.
Please note: Image quality directly depends on the size of the displayed TV / video image. The larger the TV / video image is the better is the quality of the snapshot.
Settings / Padding-Quality
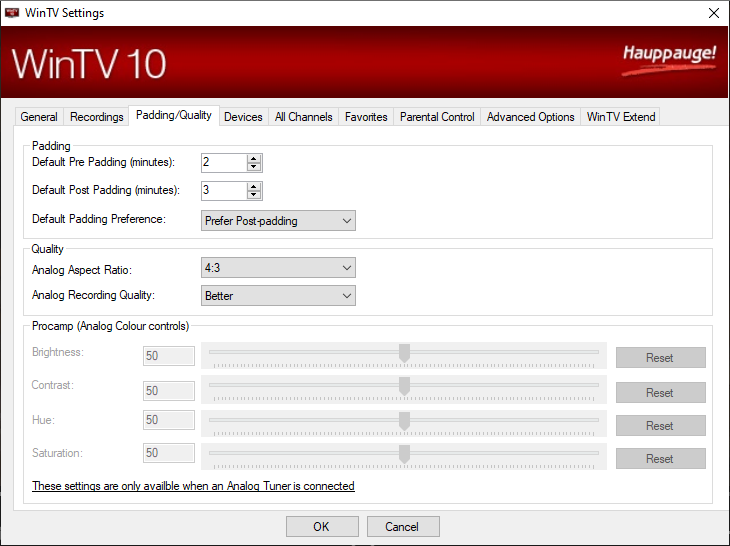
Default Pre Padding (minutes): Specify how many extra minutes a recordings should start using pre-padding.
Default Post Padding (minutes) : Specify how many extra minutes a recordings should continue recording using post-padding.
Default Padding Preference: Please look at WinTV Scheduler for information.
Analog Aspect Ratio: Select the aspect ratio for recordings from analog TV /video (Only for products with analog TV tuner / video inputs.)
Default Analog Recording Quality: Select the quality for recordings from analog TV / video here. (Only for products with analog TV tuner / video inputs.)
Settings / Devices
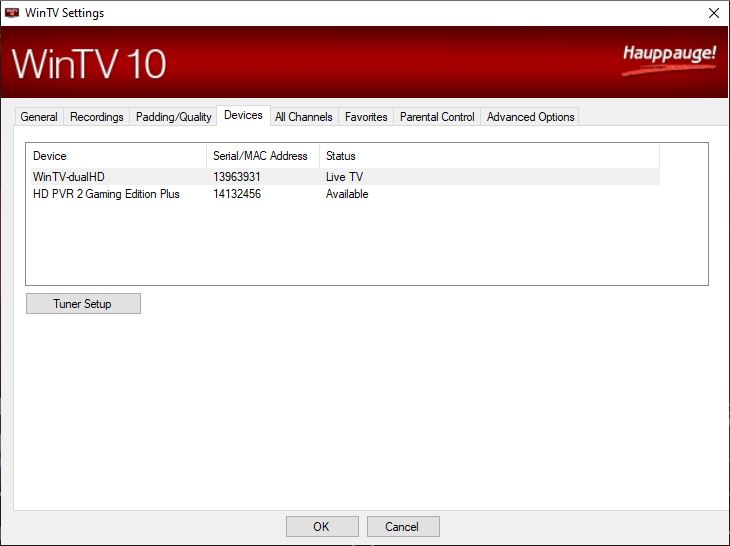
To set up the TV tuner and scan for channels, select the device from the list and click on "Tuner Setup". The Device Setup Wizard will open.
If Tuner Setup is grayed out, the product is not selected.
Please refer to the Device Setup Wizard section for the available options
Settings / All Channels
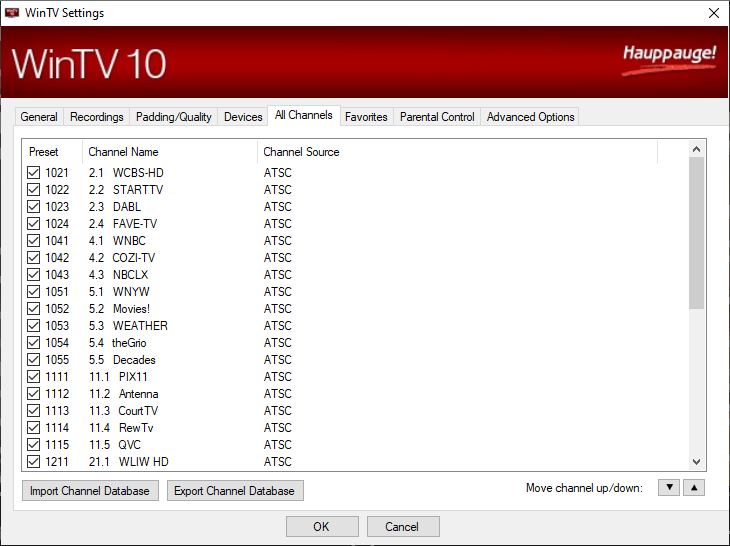
All channels from the channel database are listed.
With the checkmark in the first column, channels can be enabled or disabled. Unchecked channels will be hidden from the channel list in the main menu window.
Channels are sorted only based on the Preset number
Right click on a channel to open a context menu:
Menu option "Select All": Selects all channels in the list.
Menu option "Delete": Deletes the selected channel(s) permanently from the database.
Menu option "Tune": Tunes to the selected channel for watching / listening.
Menu option "Details": Opens a dialog window with details about the channel.
View and Edit Details about a Channel
When selecting "Details" from the menu, the Edit Channel window is opened.
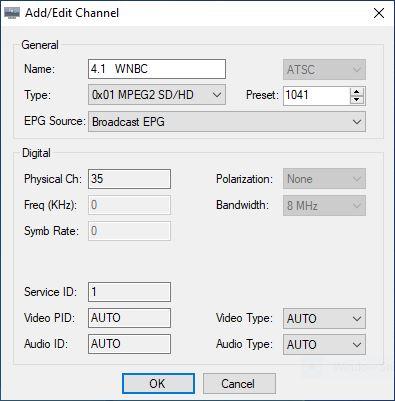
General
Name: You can edit the name of the channel in the "Name" field.
Type: Type of signal can be selected manually if needed.
Preset: You can change the position of a channel in the list by changing the number in the "Preset" field. Note: If the new position is in use by another channel already, the other channel is moved to the end of the list.
EPG Source: Explanation Needed
The other options in this dialog are for the purpose of information only, and cannot be edited.
Moving a Channel up or down
You can move the selected channel up or down using the arrow buttons ![]() . This would change the channel numeric number.
. This would change the channel numeric number.
Settings / Favorites
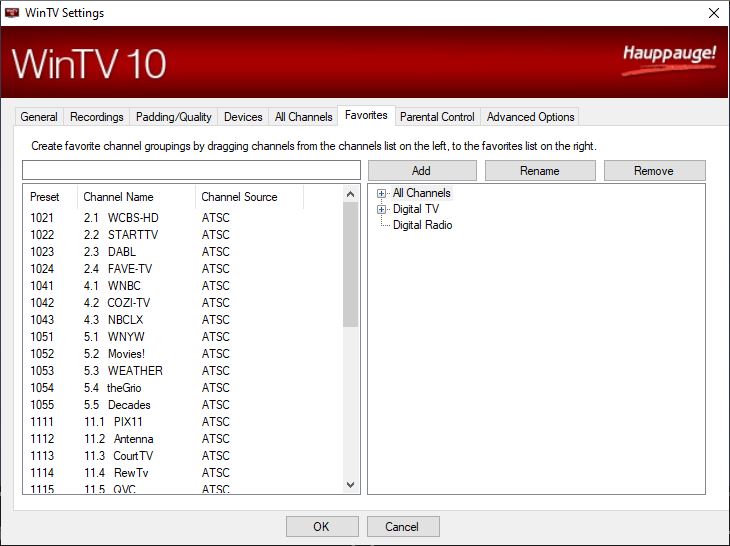
Defining Favorites
On the left side all existing channels are listed. The right side shows the pre-defined and user defined channel groups and some buttons.
Add: Creates a new channel group named "New Group", which can then be renamed.
Rename: Used to rename the selected channel group.
Remove: Deletes the user defined channel group or a channel from a group. (This does not actually remove the channel from the database.)
To create a new group with your favorites:
-
Click on Add, to create a new group.
-
Rename this group to "My Channels" (for example).
-
Click on a channel in the left list, drag this channel over to your channel group while holding down the mouse button, then release the mouse button. The selected channel is placed in the channel group. Repeat this procedure with all desired channels.
Note: The "Favorites" tab is not designed to sort, rename or delete channels from the database. Use the "All Channels" tab for these tasks.
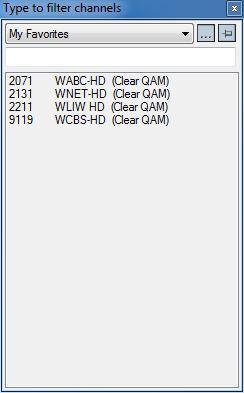
Using Favorites
After a new group has been defined, it will be shown in the drop down list under the Find Channels menu on the main TV window. When selecting this channel group, only channels from the group will be displayed.
Settings / Parental Control
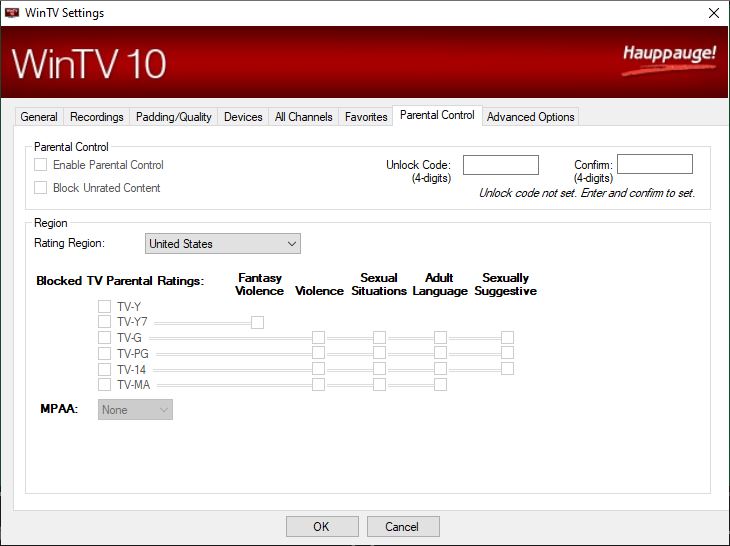
This dialog allows you to enable Parental Control on digital TV programs, and is available on products for North America only.
Parental Control
Enable Parental Control: Once you have set the 'Unlock Code', you can select this option to enable parental control.
Block Unrated Content: If this option is enabled, unrated TV content will not be displayed.
Unlock Code: The Unlock Code is a password chosen by yourself. Enter the password into the 'Unlock Code' field and retype the same password in the 'Confirm' field. After the Unlock Code has been set, the Parental Control option can be enabled. If you want to disable parental control, or change settings later, you will have to enter the Unlock Code again.
Region
Rating Region: Specifies the rating region.
Blocked TV Parental Ratings: Select the parental rating (and eventually sub-rating) for which TV content is to be blocked.
TV-Y: For all children, including very young children.
TV-Y7: For children age 7 and above.
TV-G: General audience; suitable for all children.
TV-PG: Parental Guidance; suggests parents to watch with their children.
TV-14: Unsuitable for children under age 14.
TV-MA: Mature Audience only.
MPAA: Specifies the film rating according to the Motion Picture Association of America.
G: General Audience. All ages admitted.
PG: Parental Guidance Suggested. Some material may not be suitable for children.
PG-13: Parents Strongly Cautioned. Some material may be inappropriate for children under 13.
R: Restricted. Under 17 requires accompanying parent or adult guardian.
NC-17: No one of age 17 and under admitted.
X: Same as NC-17.
Settings / Advanced Options
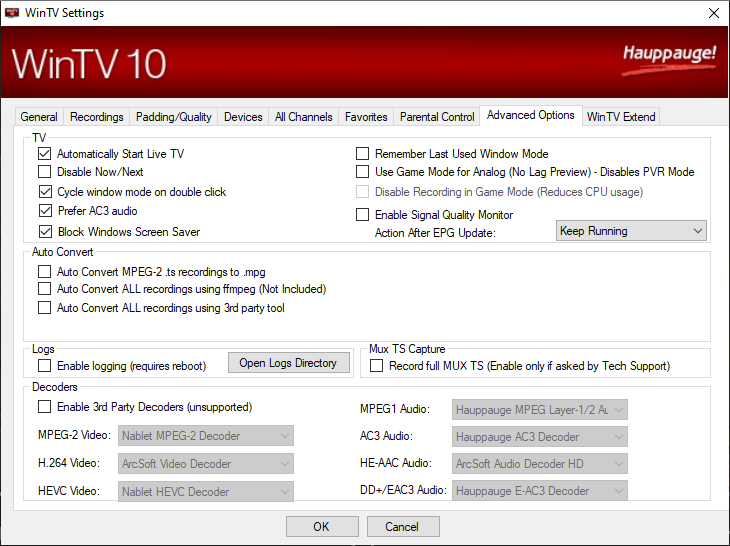
TV
Automatically start Live TV: If enabled (default), on startup of the WinTV application, live TV is started automatically.
Disable Now/Next: If this option is checked, the Now/Next electronic program guide information is not shown when changing channels.
Disable OSD Graphics: If this option is checked, the On Screen Display annunciators are not displayed (for example "Mute" or the channel number).
Cycle window mode on double click: If enabled (default), on double click inside the TV image the application view mode cycles through "Normal ", "No Title" and "Full Screen". If not enabled, a double click switches between the current view and "Full Screen", where the current view may be "Normal" or "No Title". (You can also change the application view in the WinTV menu).
Prefer AC3 audio: If enabled (default), AC3 audio is preferred over MPEG audio, if a channel offers MPEG audio and AC3 audio.
Block Windows Screen Saver: If enabled (default), it will stop screen saver from running while WinTV is active.
Remember Last Used Window Mode: If enabled WinTV will remember the window mode (Title, No title, Full screen) when closing and will open in that mode the next time it is run.
Use Game Mode for analog (No Lag Preview) - Disables PVR Mode: In normal mode the TV / video displayed in WinTV is delayed for a few seconds, because it is buffered on hard drive or in memory. In Game Mode the analog TV / Video is displayed without delay. You should enable Game Mode if you intend to connect a game console to the video input of WinTV. In Game Mode these functions are disabled: Pausing TV (TimeShift) (You can still record and make snapshots in Game Mode.) After changing the Game Mode setting, you need to reboot Windows. If you have a slower PC game mode can help smooth out analog video if the CPU is running at near maximum.
Please note: The Game Mode option is available on certain WinTV products only.
Disable Recording in Game Mode (Reduces CPU usage): On systems with low CPU performance (some netbooks for example) it is recommended to check this option, if you do not intend to record live TV / video. This will reduce CPU load when displaying live TV / video. In this mode the following functions are disabled: Pausing TV (TimeShift), recording and teletext.
Action After EPG Update:
Auto Convert
Auto Convert MPEG-2 .ts recordings to .mpg: In general all recordings are made in the Transport Stream (TS) format (file extension .ts). If this option is enabled, the transport stream file is converted into the Program Stream (PS) format (file extension .mpg), after the recording is completed. This only applies to TV channels using the MPEG-2 video encoding.
Recordings from TV channels broadcast according to the H.264 standard (usually HD quality) and also DVB radio recordings are not converted into the program stream format.
The differences between PS format and TS format are file size and the type of information that can be included in the stream. TS files are bigger than PS files, but can also contain subtitles, teletext data or several audio streams. PS files are smaller, but only contain one video stream and one audio stream.
Auto Convert all recordings using ffmpeg (Not Included) : You can acquire FFmpeg for windows at the following link https://ffmpeg.zeranoe.com/builds/.
You need to point WinTV to the ffmpeg.exe by clicking the browse button to use that tool.

Auto Convert all recordings using 3rd party tool: You would also have to point WinTV to the third party tool executable file to convert files and add your command line parameters.
Logs
Log files are used for troubleshooting.
Enable logging (requires reboot): If enabled, extended information from the HauppaugeTVServer and Capture Modules is logged. Changes take effect after the system is rebooted.
Open Logs Directory: Opens the 'Logs' folder in Windows Explorer, where all log files generated by WinTV are located.
Mux TS Capture
Record full Mux TS (Enable only if asked by Tech Support): This will record a full channel mux stream that our engineers can use for solving issues.
Decoders
Enable 3rd Party Decoders: This option allows to use 3rd Party Decoders in addition to, or as a replacement for the decoders that are installed by the WinTV software. Unsupported feature, only make changes for troubleshooting purposes.
Settings / WinTV Extend
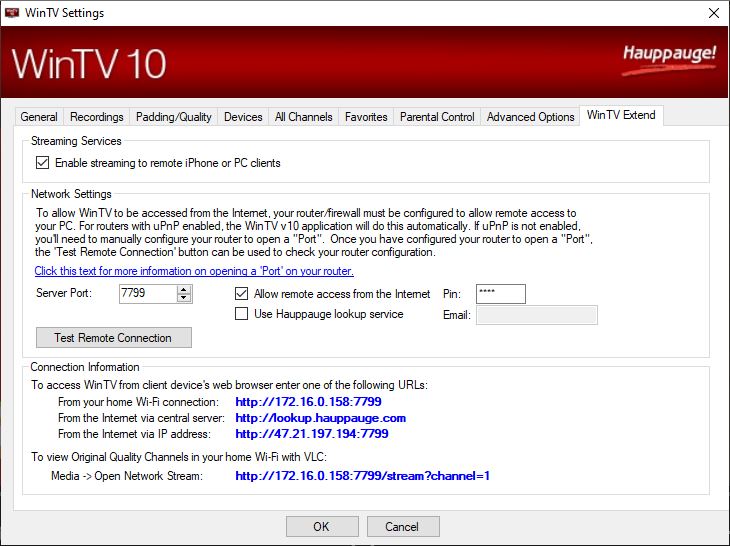
WinTV Extend
WinTV Extend is an optional purchase which lets you stream your Channel lineup to another computer, your mobile phone and handheld devices.
Please refer to the Quick Installation Guide for setup instructions at this link: Extend QI (PDF format)
Streaming Services
Enable streaming to remote iPhone or PC Clients: By default after installation WinTV Extend will be activated. Uncheck this to disable WinTV Extend.
Network Settings
Server Port: By default WinTV Extend uses port 7799. It can be changed in this menu. WinTV Extend Server must be restart to take effect.
Allow remote access from the internet: Uncheck if only want extend available in local network.
Pin: Pin to access extend remotely. By default the pin is 0000.
Use Hauppauge lookup service: This will tell our server the real IP for extend on random intervals. You can ten access it by going to http://lookup.hauppauge.com
Email: Type email to access Hauppauge Lookup Service.
Connection Information
The WinTV Extend links are provided in this section to access WinTV Extend